Showing posts with label Ubuntu. Show all posts

Installing Oracle 11g R2 Express Edition on Ubuntu 14.04 64-bit Virtual Machine

I need Oracle APEX for one of my project. Instead of waiting for the company DBA configure a workspace for me, I decide to install a local copy of Oracle and APEX myself to familar with.This is part one: install Oracle on UBuntu 14.04 64Bit

Environment

Ubuntu 14.04 64Bit virtual machine
Oracle 11g R2 Express Edition (XE)

Requirement:

Please go over every item below to make sure that your system meets these requirements.

1). Oracle 11g R2 Express Edition may require up to 2GB swap space. please use free -m to verify that you have at least 2G swap space. If you do not have enough swap space, like in my case, then do the followings.

Figure 1. verify that you have enough swap space.

#switch to root
sudo su -
#create swap file on /swapfile
dd if=/dev/zero of=/swapfile bs=1024 count=1048576
mkswap /swapfile 
swapon /swapfile
#backup old fstab file and create a new one
cp /etc/fstab /etc/fstab.bak_`date +%N`
echo '/swapfile swap swap defaults 0 0' >> /etc/fstab
#enable all swap devices
swapon -a
#verify the new swap devices
swapon -s
free -m
2). Install alien for converting the downloaded installer from Red Hat format into Ubuntu-specific installer
sudo apt-get install alien libaio1
3). Configure Awk for compatibility
sudo ln -s /usr/bin/awk /bin/awk
4)Create the following folder if needed
sudo mkdir /var/lock/subsys
5). Create a special chkconfig script:
The Red Hat based Oracle 11gR2 XE installer relies on /sbin/chkconfig, which is not available in Ubuntu. This command will create a file /sbin/chkconfig to simulate the chkconfig tool.
sudo vim /sbin/chkconfig
copy and paste the following content into the newly created chkconfig file
#!/bin/bash
# chkconfig simulator for Oracle 11gR2 XE installer 
file=/etc/init.d/oracle-xe
if [[ ! `tail -n1 $file | grep INIT` ]]; then
echo >> $file
echo '### BEGIN INIT INFO' >> $file
echo '# Provides: OracleXE' >> $file
echo '# Required-Start: $remote_fs $syslog' >> $file
echo '# Required-Stop: $remote_fs $syslog' >> $file
echo '# Default-Start: 2 3 4 5' >> $file
echo '# Default-Stop: 0 1 6' >> $file
echo '# Short-Description: Oracle 11g Express Edition' >> $file
echo '### END INIT INFO' >> $file
fi
update-rc.d oracle-xe defaults 80 01
Save the above file and assign the appropriate execute privilege :
sudo chmod 755 /sbin/chkconfig
6). Fix /dev/shm to avoid having "cause ORA-00845: MEMORY_TARGET not supported on this system" error.

sudo rm -rf /dev/shm
sudo mkdir /dev/shm
sudo mount -t tmpfs shmfs -o size=2045m /dev/shm # whatever value showing in your free -m output.

Installation


1). Download Oracle 11gR2 Express Edition installer from Oracle official site. You need an account to be able to download.

2). Unzip and convert the rpm package to deb package
cd /opt/oracle_src
mv ~/Downloads/oracle-xe-11.2.0-1.0.x86_64.rpm.zip .
unzip oracle-xe-11.2.0-1.0.x86_64.rpm.zip
cd Disk1/
#prepare Ubuntu specific package
sudo alien -d -c oracle-xe-11.2.0-1.0.x86_64.rpm 
#it takes a while for the command to complete.
3). Now you are ready to install Oracle 11gR2 XE.
cd /opt/oracle_src/Disk1
sudo dpkg --install oracle-xe_11.2.0-2_amd64.deb
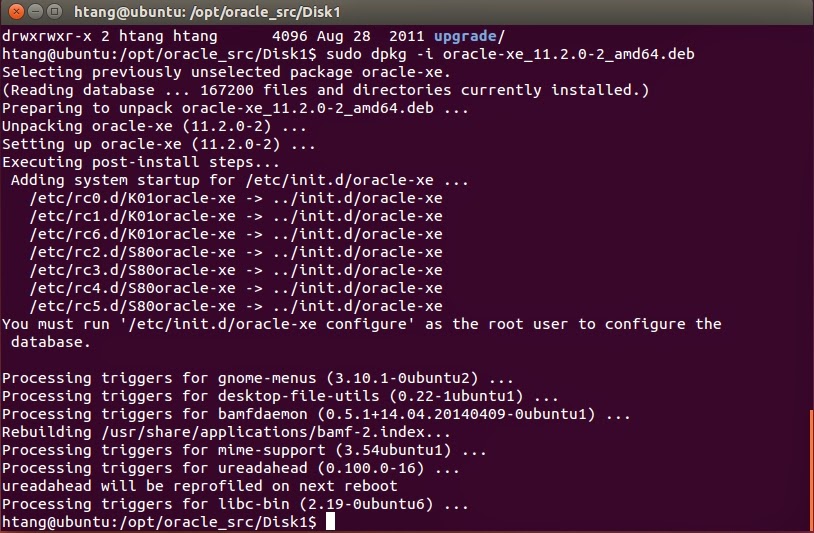
 Fig 2. Output from installing script
4) configure
sudo /etc/init.d/oracle-xe configure
Enter the following configuration information:
HttP port:8080
port used for database listener:1521
password for SYS and SYSTEM:tiger
Do you want Oracle XE to be startted on boot: yes
Congratulations, once you see the following figure.
Fig 3. Success configuration screen

5. Post-installation configuration
5.1 Set-up environmental variables : add the following lines to ~/.bashrc file
vim ~/.bashrc
#copy the following line to file .bashrc
export ORACLE_HOME=/u01/app/oracle/product/11.2.0/xe
export ORACLE_SID=XE
export NLS_LANG=`$ORACLE_HOME/bin/nls_lang.sh`
export ORACLE_BASE=/u01/app/oracle
export LD_LIBRARY_PATH=$ORACLE_HOME/lib:$LFigure 1. verify that you have enough swap space.D_LIBRARY_PATH
export PATH=$ORACLE_HOME/bin:$PATH
5.2 update environment variable
. ~/.bashrc
5.3 try logging into database
sqlplus sys as sysdba [tiger]
6. Use APEX The default APEX installed is Application Express 4.0.2.00.09, which could be reached at http://127.0.0.1:8080/apex

Question and solution 

1.Database configuration failed during configuration step."Database Configuration failed.Look into /u01/app/oracle/product/11.2.0/xe/config/log for details". When I look at these files, ORA-00845: MEMORY_TARGET not supported on this system was the main complain.
Solution:
1) Do step 6 in requirement section
2) then do these steps below
# get the pid of oracle, 3120 in my case
ps aux | grep oracle 
#kill oracle
sudo kill 3120
#check again to make sure that oracle is killed
ps aux | grep oracle 
#remove the installation
sudo dpkg --purge oracle-xe
rm -r /u01
rm /etc/default/oracle-xe
update-rc.d -f oracle-xe remove
5) re-run the installation step 3) and 4)

Firefox Always Crashes in Ubuntu

Recently Firefox always crashes in my Ubuntu box. By looking at the crash report I noticed that add-ons might have something to do with the crash. However, the problem is still there after removing/disabling all add-ons. I even tried to update Firefox, that does not solve the problem neither. I then tried remove all contents related to Firefox and reinstalled it, and it seems fix the problem for me.
sudo apt-get --purge remove firefox
rm -rf ~/.mozilla/firefox/
sudo rm -rf  /usr/lib/firefox*
sudo apt-get install firefox

Upgrade PostgreSQL from 9.1 to 9.3 on Ubuntu

At the time of writing, you could not install postgreSQL 9.3 on Ubuntu using apt-get. Here is simple instruction of updating postgreSQL on Ubuntu to v9.3
#install dependency
sudo apt-get update
sudo apt-get -y install python-software-properties
#add repository
wget --quiet -O - https://www.postgresql.org/media/keys/ACCC4CF8.asc | sudo apt-key add -
#setuop repository
sudo sh -c 'echo "deb http://apt.postgresql.org/pub/repos/apt/ precise-pgdg main" >> /etc/apt/sources.list.d/postgresql.list'
#install
sudo apt-get install postgresql-9.3 postgresql-server-dev-9.3 postgresql-contrib-9.3
#upgrade
sudo su -l postgres
psql -d template1 -p 5433
CREATE EXTENSION IF NOT EXISTS hstore;
CREATE EXTENSION IF NOT EXISTS "uuid-ossp";
\q #logout from database
service postgresql stop
/usr/lib/postgresql/9.3/bin/pg_upgrade -b /usr/lib/postgresql/9.1/bin -B /usr/lib/postgresql/9.3/bin -d /var/lib/postgresql/9.1/main/ -D /var/lib/postgresql/9.3/main/ -O " -c config_file=/etc/postgresql/9.3/main/postgresql.conf" -o " -c config_file=/etc/postgresql/9.1/main/postgresql.conf"
exit # logout postgresql back to previous user
sudo apt-get remove postgresql-9.1
sudo vim /etc/postgresql/9.3/main/postgresql.conf # find old port of 5433 and change it to 5432
sudo service postgresql restart
Issues you may encounter: when you run the real update command above (/usr/lib/postgresql/9.3/bin/pg_upgrade...), you may notice failure and show error of "Problem of connection to database failed: fe_sendauth: no password supplied " The solution would be modify pg_hba.conf of two data directories in trust mode (NO PASSWORD) authentication then re-run pg_upgrade command. Example, # Database administrative login by Unix domain socket local all postgres trust

How to Remove All Unused Linux Kernel Headers, Images and Modules

Use the following command to remove
dpkg -l 'linux-*' | sed '/^ii/!d;/'"$(uname -r | sed "s/\(.*\)-\([^0-9]\+\)/\1/")"'/d;s/^[^ ]* [^ ]* \([^ ]*\).*/\1/;/[0-9]/!d' | xargs sudo apt-get -y purge

#Then regenerate grub menu,
sudo update-grub to regenerate grub list
Credit goes to original source

PyQt Menubar in Ubuntu does not show

Have you ever wondered why Menubar defined in your program using PyQt does not show in Ubuntu? However it works fine in Window. Well here is the answer: Menubar is outside the application in Ubuntu. You can find it in global menu. Look for it at the top left corner next to the close/mini/max icon.

An example ERROR message of running GUI applications written in Qt toolkit in Ubuntu

ERROR: (python:52708): Gtk-CRITICAL **: IA__gtk_widget_style_get: assertion 'GTK_IS_WIDGET (widget)' failed One solution to this error is installing qt4-qtconfig, a Qt 4 configuration tool
#install
sudo apt-get install qt4-qtconfig
# run the configuration
qtconfig
#config
#In the Appearance tab of the Qt Configuration application, locate "Select GUI Style" menu and choose "Plastique" option from drop down list.
#Save and exit

Windows 8 Time Always Wrong When Dual Boot With Ubuntu

I installed Ubuntu on a new Dell computer which has windows 8 preinstalled. The time of Windows 8 computer always 5 hours ahead after returning from a Ubuntu session. After a little research I found that windows 8 is no longer supporting UTC time out of the box. To fix the problem,I configured Ubuntu to use localtime. To do so,
sudo vim /etc/default/rcS
# change UTC=yes to UTC=no in this file under the following sentence in rcS file
# assume that the BIOS clock is set to UTC time (recommended)
UTC=no

Install Eclipse Kepler On Ubuntu 12.04.3

Here are the simple steps, I used to update eclipse to Kepler on my Ubuntu 12.04.3 box. 1. download the appropriate package of eclipse from http://www.eclipse.org/downloads/ untar the package and copy it to the location you prefer, /opt in my case
# untar
tar -zvxf eclipse-standard-kepler-R-linux-gtk-x86_64.tar.gz
# copy the uncompressed folder into /opt
sudo cp -R eclipse /opt
# change owner of all files to root
sudo chown -R root:root /opt/eclipse
2. link eclipse executable to /usr/bin/
sudo ln -s /opt/eclipse/eclipse /usr/bin/eclipse
3. Create the following .desktop file if you want to be able to pin eclipse to the luncher.
# create eclipse.desktop file at /usr/share/applications/
gedit /usr/share/applications/eclipse.desktop
4. put the following contents in the file
[Desktop Entry]
Name=Eclipse
Type=Application
Exec=/opt/eclipse/eclipse
Terminal=false
Icon=/opt/eclipse/icon.xpm
Comment=Integrated Development Environment
NoDisplay=false
Categories=Development;IDE
Name[en]=eclipse.desktop
Now we are all set.

Set Static IP for Ubuntu 12.04

1. Edit /etc/network/interfaces and put the IP address along with other information
auto lo eth0
iface lo inet loopback
iface eth0 inet static
address 192.14.0.102
netmask 255.255.224.0
gateway 192.14.0.1
dns-search example.com
dns-nameservers 192.14.0.194 192.14.0.180
2. use netstat -r to verify that you have default route.
If no, you need add one by using:
sudo route add default gw [ip_address_for_default_gateway]
3.check whether you have entries in /etc/resolve.conf file.For example,
nameserver 192.14.0.194
nameserver 192.14.0.180
search example.com EXAMPLE.COM

Install Hadoop 1.1.2 on Ubuntu 12.04

Here is the example of installation of Hadoop on a single machine, UBuntu box in this case. For a simple cluster installation, please reference to Running Hadoop on Clusters of Two Nodes using Ubuntu and CentOS.
1. install hadoop 1.1 download Hadoop-1.1.2 (STABLE VERSION OF THE HADOOP)
http://archive.apache.org/dist/hadoop/core/hadoop-1.1.2/hadoop-1.1.2.tar.gz
1.2 untar the package to /opt 1.3 find the JAVA_HOME and HADOOP_HOME directory and add them to .bashrc file
echo export JAVA_HOME = /usr/lib/jvm/java-6-openjdk >> ~/.bashrc
echo export HADOOP_PREFIX = /opt/Hadoop-1.1.2 >> ~/.bashrc
1.4 add $HADOOP_PREFIX/bin to your $PATH variable
export PATH=$PATH:$HADOOP_PREFIX/bin
export PATH=$PATH:$HADOOP_PREFIX/sbin
2. Decide the running mode of your Hadoop:
local mode
standard/local alone mode
Pseudo-Disributed mode
2.1 If you want to start Hadoop in Pseudo-Distributed mode, edit the following three configuration files at $HADOOP_PREFIX/conf, core-site.xml, hdfs-site.xml and mapred-site.xml
#core-site.xml
<?xml version="1.0"?>
<?xml-stylesheet type="text/xsl" href="configuration.xsl"?>
<configuration>
<property>
<name>hadoop.tmp.dir</name>
<value>/home/username/projects/hdfs_test</value>
</property>
<property>
<name>fs.default.name</name>
<value>hdfs://localhost:54310</value>
</property>
</configuration>
#hdfs-site.xml
<?xml version="1.0" encoding="UTF-8"?>
<?xml-stylesheet type="text/xsl" href="configuration.xsl"?>
<configuration>
<property>
<name>dfs.replication</name>
<value>1</value>
</property>
</configuration>
#mapred-site.xml
<?xml version="1.0"?>
<?xml-stylesheet type="text/xsl" href="configuration.xsl"?>
<configuration>
<property>
<name>mapred.job.tracker</name>
<value>localhost:54311</value>
</property>
<property>
<name>mapred.system.dir</name>
<value>/home/username/projects/mapred/system</value>
<final>true</final>
</property>
</configuration>
2.2 create file hadoop-env.sh in $HADOOP_PREFIX/etc/, and write the following to the file:
vim $HADOOP_PREFIX/conf/hadoop-env.sh
export JAVA_HOME = /usr/lib/jvm/java-6-openjdk
3. Format the HDFS system
hadoop namenode -format
4. Start Hadoop
start-all.sh
5. usefule comamnd to check the HDFS system
hadoop fs -ls /: list the root of HDFS
hadoop fs -ls: (without '/'):
# if you could not get anything other than the following error msg:
#"ls: Cannot access .: No such file or directory.".
#You need to do the following steps to make it work.
hadoop fs -mkdir /user
hadoop fs -mkdir /user/username
# Now you should be able to run hadoop fs -ls because by default hadoop is looking for
# "/user/username" structure within HDFS. The error msg is means there is no such structure in HDFS.
#To avoide the error msg we need to create the structure within HDFS for Hadoop.
6. copy files from local "linux" to HDFS I used two text files for testing: file1.txt and file2.txt, they are located at /home/username/projects/hadoop 6.1 copy three files from local to hadoop file system
hadoop dfs -copyFromLocal /home/username/projects/hadoop /user/username
# check copy result
hadoop dfs -ls /user/username/
6.2 download the word-count example from http://repo1.maven.org/maven2/org/apache/hadoop/hadoop-examples/1.0.3/hadoop-examples-1.0.3.jar and put it /home/username/projects/hadoop 6.3 run the mapreduce job
hadoop jar  hadoop-examples-1.0.3.jar wordcount /user/username /user/username-output
# notes for this command:
#(1) if  you see io exception, you might use full path for the jar package
#(2) path "/user/username-output" is the output path for mapreduce, it has not been there before running the job.
6.4 Retrieve the job result from HDFS
# 1. merge mapreduce outputs and copy to local path: /home/username/projects/hadoop/output
hadoop dfs -getmerge /user/username-output /home/username/projects/hadoop/output
7. Hadoop Web Interfaces
NameNode daemon: http://localhost:50070/
JobTracker daemon: http://localhost:50030/
TaskTracker daemon: http://localhost:50060/
7. Questions
Q. $HADOOP_HOME is depreciated always showing up when you run hadoop commands.
A. Replace HADOOP_HOME in your ~/.bashrc file with HADOOP_PREFIX. Check whether $HADOOP_HOME is defined in other places using echo command when you open new terminal.

Use Apache Virtual Host/ Reverse Proxy on Ubuntu

1. install apache2 on Ubuntu
sudo apt-get install apache2
You may notice that http.conf file located at /etc/apach2/ is emplty, which is normal since we are using apache2.conf instead 2. Create symbolic links to enable the proxy modula in Apache2, then restart the server
sudo ln -s /etc/apache2/mods-available/proxy.load /etc/apache2/mods-enabled
sudo ln -s /etc/apache2/mods-available/proxy_http.load /etc/apache2/mods-enabled
sudo /etc/init.d/apache2 restart
3. Create a virtual host file:
sudo gedit /etc/apache2/sites-enabled/proxiedhosts
# and edit the file so that it resembles:
NameVirtualHost *:80  # do not forget this line of code.
<VirtualHost *:80>
ServerName example.com
ProxyRequests off
ProxyPass / http://localhost:8080/
ProxyPassReverse / http://localhost:8080/
</VirtualHost>
It is obviously we are forwarding any request on port 80 to port 8080 4.Activate the virtual host file by making a symbolic link to the Apache2 sites-enabled folder then restarting Apache2:
sudo ln -s /etc/apache2/sites-enabled/proxiedhosts /etc/apache2/sites-enabled
sudo /etc/init.d/apache2 restart

Slow Authentication when SSH Connecting To Your Ubuntu Box

I noticed a dramatic slower authentication process when doing ssh connection to my Ubuntu box than connecting to CentOS box.
time ssh 102.14.98.241
After logging in, type exit and it reveal the time consumed as the following:
real 0m30.397s
user 0m0.012s
sys  0m0.020s
After little research I found modify one line in /etc/ssh/sshd_config could fix the problem.
sudo vim  /etc/ssh/sshd_config
# add the following line
UseDNS no
#save file and restart sshd server
sudo /etc/init.d/ssh restart
Test the new time consuming, use time ssh 102.14.98.241 shows
real 0m5.309s
user 0m0.013s
sys  0m0.015s

Install cx_Oracle on Ubuntu from rpm package

Make sure that you have installed Oracle instant client. If not, please follow this post.
1. make sure that the path in your oracle.conf file contains libclntsh.so.11.1 file
cat /etc/ld.so.conf.d/oracle.conf
#it shows
/usr/lib/oracle/11.2/client64/lib
# verify that the path contains libclntsh.so.11.1
ll /usr/lib/oracle/11.2/client64/lib | grep libclntsh
lrwxrwxrwx 1 root root        17 Aug  5  2013 libclntsh.so -> libclntsh.so.11.1
-rw-r--r-- 1 root root  52761218 Sep 17  2011 libclntsh.so.11.1
2. update ld.so.cache
sudo ldconfig
3. download and install cx_Oracle library from rpm package
sudo alien -i cx_Oracle-5.1.2-11g-py27-1.x86_64.rpm
4. Configure cx_Oracle to work with Python2.7 within Ubuntu
cd /usr/lib/python2.7
sudo mv site-packages/cx_Oracle* dist-packages/
sudo rmdir site-packages/
sudo ln -s dist-packages site-packages

Install rpm Packages in Ubuntu

If rpm package is all you got for a software package, you could follow the following instructions to install it on Ubuntu:
# install alien and all the dependencies it needs
sudo apt-get install alien dpkg-dev debhelper build-essential
# Convert a package from rpm to debian format
sudo alien packagename.rpm
# Use dpkg to install the package
sudo dpkg -i packagename.deb

Install Flash Player in Ubuntu

Can not watch youtube video in Ubuntu? Here is a solution:

sudo apt-get install flashplugin-installer

Enable print to pdf in Ubuntu

apt-get install cups-pdf

The printed pdf file will be located at ~/PDF/

Installation of Ubuntu on Vista pre-installed machine and preparation for using EasyBCD as booting manager

Installation of Ubuntu on Vista pre-installed machine and preparation for using EasyBCD as booting manager.

1. First you need prepare some free disk space for ubuntu by using Vista disk manager.

2. Insert your Ubuntu CD or DVD in the drive, and boot from it to begin setup. Choose "install Ubuntu" from the
bootable menu.

3. Follow the on screen instructions until you get to a screen asking you for your preferred method of
partition your hard drives. Make sure you choose "manual" at this point so you can configure your dual-boot
exactly as you need it.

3. Find the free space on the drive which you prepared in vista and create a new
partition there. Choose "ext3" as the filesystem type, and use it as the root "/" the mountpoint.
Here you can partition (n-2)G of your free space as the main partition to install Ubuntu. And use the rest of the partition 2G as the swap disk (choose swap as filesystem).

4.Once you've partitioned the drive the way you like it, you come to the single most-important step: telling Ubuntu
where to install GRUB, the Linux bootloader.
pay special attention here, on the final install conclusion screen there is a "advanced" button, click it to set up the installation destitionation of GRUB. Here you need to choose the partition which you used as the root mountpoint.

4.finished installation.
5.Boot into vista and install EasyBCD.
6. go to "Add/remove Entries" page. choose "Linux" tab from the bottom-half of the screen.
7.Pick the partition you installed Ubuntu to earlier from the drop-down partition list and choose "Add entry"
8. save

Simple code to check the version of Ubuntu you are running

Here is a simple code to check the version of Ubuntu you are running:
lsb_release -a

Did you solve your slow Internet connection on Ubuntu 8.1?

Recently I am facing a slow Internet connection problem on my newly installed Ubuntu 8.1.

Let me describe the problems first:

During the first couple days of using newly installed Ubuntu, I have no problem and the Internet is as fast as in Vista. But after a couple of updates, the Internet speed changes dramatically. As I noticed the mainly change is the browsing speed not the download speed. It needs at least 1 minute to open gmail.

I tried several methods to improve the browsing speed, like disable IPV6; switch to another browser,like Opera,Swiftweasel; install dnsmasq and change the MTU value; as suggested but none of them work on my case.


Untill today, I find a solution from http://www.prash-babu.com/2008/04/how-to-configure-dns-servers-in-linux.html

It really works for me, so I want to introduce it to you, if you are facing the same problem like me. Why not try?

Do the following steps to configure DNS servers in Ubuntu:

Step 1:Go to Applications->Accessories->Terminal and type
sudo gedit /etc/dhcp3/dhclient.conf
Step 2:Go to the end of the file and add the following line to the END of the file
prepend domain-name-servers 208.67.222.222,208.67.220.220;
Step 3:Save the file and close it.
Step 4:Use the following command to restart your network
sudo /etc/init.d/networking restart

Step 5: Open your favorite browser to check whether works or not.

My way to install Ubuntu on Vista preinstall computers

Dual Boot of Windows Vista and Ubuntu and use EasyBCD as bootloader

If your new computers comes with Windows Vista preinstalled, please follow the following procedure to install Ubuntu and.

1.Log into Vista open disk manager to free some disk spaces.
2.Reboot your computer use Ubuntu Live CD. Choose “setup Ubuntu” from the bootable manual .
3.Click the install icon on the live session Ubuntu desktop, follow the instruction until you see “choose the partition method”.
4.Make sure you choose manual at this step and click next.
5.In the next screen, select the free disk spaces which you prepared in Vista and create a new partition. Usually, you can make a partition as large as the (your maximum free disk space -2G), and select the file system type as ext3, mount point is root “/”.
6.use the rest of 2G free disk create a new partition, swap, choose the file system type “swap”.
7.Once you partitioned your disk, before you install your Ubuntu, on screen 7, choose “advanced” and select the partition which you used to install the root of Ubuntu to install the Ubuntu boot loader. In my case I installed Ubuntu at “sda6”, so I choose it to install GRUB.
This step is important if you want to use vista boot loader.
8. Finish the rest steps on installation and grab a cup of tea.

After finishing install Ubuntu, log into Vista and install EasyBCD boot loader:


9.Open EasyBCD and go to the "Add/Remove Entries" page.
10.Choose the "Linux" tab from the bottom-half of the EasyBCD screen.
11.Pick the partition you installed Ubuntu from the drop-down partition list (In my case it is sda6, as I mentioned early)and choose "Add Entry".
Now you have Vista and Ubuntu dual boot.

Datatable static image not found on the server

When you use ```datatables.min.css``` and ```datatables.min.js``` locally, instead of datatables CDN, you may have encountered that ```sort...