Upgrade APEX from 4.02 to 4.2.5 on Ubuntu

The version of APEX installed along with Oracle 11g R2 Express Edition is V4.0.2 which is not the latest version. Here is a tutorial of how to upgrade APEX from version 4.0.2 to version 4.2.5.

1. Download the latest version of Application Express from the Oracle Technology Network and Unzip the downloadloaded zip file:
unzip apex_4.2.5_en.zip
#change the working directory to unzip folder
cd apex
2. Start SQL*Plus and connect to the Oracle XE database:
sqlplus /nolog
SQL> CONNECT SYS as SYSDBA
Enter Password: 
SYS_Password
3. Install Application Express:
SQL> @apexins SYSAUX SYSAUX TEMP /i/
4. Copy images folder from apex/images to a different location to prevent failure of loading images in the next step
mkdir -p /tmp/apex/images/
cp -r imges/* /tmp/apex/images

5. Log back into SQL*Plus (as above) and load images:
SQL> @apxldimg.sql /tmp
6. Upgrade Application Express password:
SQL> @apxchpwd
Enter password for Application Express ADMIN account.
7. In a Web browser, navigate to the Oracle Application Express Administration Services application:
http://127.0.0.1:8080/apex/apex_admin
In Username, enter ADMIN
In Password, enter the password entered in Step 6

Allow outside Connectino to Server Running in VMWare Player on Ubuntu

Here is a tutorial of how to enable other computer than your host computer connect to web server running in VMWare Player.
1. Modify nat.conf file
sudo vim /etc/vmware/vmnet8/nat/nat.conf
locate incomingtcp section modify accordingly.
[incomingtcp]

# Use these with care - anyone can enter into your VM through these...
# The format and example are as follows:
#<external port number> = <VM's IP address>:<VM's port number>
8080 = 192.168.64.131:8080

2. close VMWare Player application and restart vmware to make the configuration take effect.
sudo service vmware restart

Modify a python package installed as a single EGG file

Sometimes, you want to modify a python package installed in your python library. How about if you see the package youjust installed is a single .egg file? You could still open it with your favorite decompress program, such as 7zip, since we know .egg file is just a ZIP file. After decompress you get folders which contain regular.py and .pyc file for you to work on. Then you can put the decompressed folder into your site-package directory keeping the same name (use original .egg name as directory name).

Make post request using m2urllib2 from M2Crypto

I was debugging a POST request initiated by m2urllib2.urlopen(req) without success. All I got are GET request. Till this morning I realized one parameter has been causing problems.

Old request (GET request)

req = m2urllib2.Request('https://openam.example.com:8445/openam/json/piv/authenticate','None', headers)
res = m2urllib2.urlopen(req)

Revised request (POST request)

req = m2urllib2.Request('https://openam.example.com:8445/openam/json/piv/authenticate','', headers)
res = m2urllib2.urlopen(req)
Pay attention to the second parameter in m2urllib2.Request, if I use 'None', it would be GET request; if I use '', it would be POST request. I could not find out why.

Configure Firefox with Smart Card Reader in Ubuntu

Firefox in Ubuntu does not support Smart Card reader out box. In this tutorial, I used SCR3310 V2.0 as example. Reader my other post regarding how to set up this reader in Ubuntu and enable pcscd service.

1. We need libopensc.so.3 file from OpenSC package

#Install opensc
sudo apt-get install opensc

2. Open Firefox, click "Open Menu" >>"Preferences">>"Advanced">>"Certificates" >>"Security Devices">>"Load"


in the "Load PKCS#11 Device" window, put
Module Name: PIV Card Reader (or any name as you wish)
Module filename: "/usr/lib/opensc-pkcs11.so"

3. Restart Firefox you should be able to see all your certificates on PIV card under "Certificates">>"Your Certificate" tab.


Understand Bash History and how to Clear

A good article about bash history and how to clear bash history.
In a pinch, you can clear all your bash shell’s command history by typing this command:
history -c
However, there are a few things about how bash shell’s history that worth a closer look.
The bash shell stores the command history in a file, this is typically ~/.bash_history. It is a simple text file with one command per line. Whenever an interactive instance of the bash shell is created, the bash shell loads the history into the memory. As long as the shell is running all new typed commands are appended in the history, but they only exist in memory. The history will be written to~/.bash_history when the shell is terminated (or if you issue the history -w command, whichever comes first).
There is nothing wrong with that, as long as you use only one instance of the bash shell at a time. Consider this: you log into your computer and open two terminal windows. You do some work on the first shell, then you do some other work on the second shell. When done, you want to clear all recorded history and exit. You go to the first shell and type history -c to clear the history, and then exit. Then you go to the second shell and simply type exit, thinking you already have cleared the history. You think you have cleaned up everything, but no, if you check the contents of your ~/.bash_history all the history from the second bash instance will be there, looking at you right in the eyes.
One thing you can do is to scrupulously make sure that you execute history -c before exiting every bash instance you are running. But this is kind of stressful, plus you may always run into the case of forgetting to clear the history, because people simply forget.
Another thing you may try is to add the history -c command in your ./bash_logout script, but you have to keep in mind that it works only with login shells, like the shell you are given from the console, or when running bash with the –login parameter. This will NOT work with the shells opened by terminal emulators (like the GNOME Terminal, for example).
A more effective approach would be to simply add a crontab entry that will empty the ~/.bash_history file in a reasonable frequency. This will do:
*/1 * * * * cat /dev/null > ~/.bash_history
This command in your crontab will cause the bash shell’s history file to be emptied every one minute. Please not that you cannot runhistory -c from crontab, because history is in fact an internal bash shell’s command, not a real program that can be executed from crontab.

Add New Root User in OpenDJ

Ever wondered how to add another directory administrator to OPenDJ? Here is how.
1. Create a file admin2.ldif
dn: cn=EMEN2 Admin,cn=Root DNs,cn=config
cn: EMEN2 Admin
sn: Admin
givenName: EMEN2
objectClass: inetOrgPerson
objectClass: person
objectClass: top
objectClass: ds-cfg-root-dn-user
objectClass: organizationalPerson
userPassword: juSugU4w
ds-cfg-alternate-bind-dn: cn=EMEN2 Admin
2. run the following command:
/path to opendj/bin/ldapmodify -h localhost -p 1389 -D "cn=Directory Manager" -w password_for_Directory Manager -a -f "admin2.ldif"

Setup SCR3310 V2.0 Smart Card Reader in Ubuntu 14.04 64Bit

Here I am going to demonstrate how to enable SCR3310 V2.0 smart card reader in Ubuntu 14.04 box.

Requirements

libusb and libusb-dev
pcsc-lite-1.8.11
Smart Card reader driver 64Bit
pcsc-tools (Optional)

Install

1.Install libusb and libusb-dev
sudo apt-get install libusb-1.0-0 libusb-1.0-0-dev
2.Download and install pcsclite
#download
wget https://alioth.debian.org/frs/download.php/file/3991/pcsc-lite-1.8.11.tar.bz2
tar jvxf pcsc-lite-1.8.11.tar.bz2
cd pcsc-lite-1.8.11/
#make sure that you have enable libusab and disable libudev
./configure --enable-libusb --disable-libudev
make
sudo make install
sudo make fix-rights

3. Download and install 64Bit card reader driver
wget http://support.identive-group.com/download/driver/scmccid_5.0.29_linux_64bit.tar.gz
tar zvxf scmccid_5.0.29_linux_64bit.tar.gz
cd scmccid_5.0.29_linux_64bit/
sudo ./install.sh
4.Start pcscd service
sudo /usr/local/sbin/pcscd

Test Card Reader

1. install pcsc_tools
#install
sudo apt-get install pcsc-tools
#scan card
pcsc_scan

"am_agent_init failed" during OpenAM Web Policy Agent starts up

Background

OpenAM was deployed on Apache Tomcat and Web Agent was deployed in httpd server. Both of them were running in the SAME CentOS server. Yes, I know you might laugh at me: SAME SERVER?
If start service one by by one from command line, there was no error in either the log file of web agent AGENT_DIR/apache22_agent/Agent_##/logs/debug/amAgent or on web pages which uses web agent service.
#Start service one by one
/OPENDJ_DIR/bin/start-ds
/TOMCAT_DIR/bin/startup.sh
/etc/init.d/httpd start 

However, there were errors when you put them either in one run file rc.local with the same run order or in the same order but separated using chkconfig.
#Same order in rc.local file:
OPENDJ_ROOT="/opt/sso/opendj"
TOMCAT_ROOT="/opt/sso/apache-tomcat-7.0.52"
export OPENDJ_ROOT
export TOMCAT_ROOT
cd ${OPENDJ_ROOT}
/bin/su - nctrsso -c "${OPENDJ_ROOT}/bin/start-ds --quiet"
cd ${TOMCAT_ROOT}
/bin/su - nctrsso -c "${TOMCAT_ROOT}/bin/startup.sh"
/etc/init.d/httpd start

Using chkconfig tool to set run order.
#same order but seperate using chkconfig
S11ssoopendj -> ../init.d/ssoopendj
S18ssotomcat -> ../init.d/ssotomcat
S99httpd -> ../init.d/httpd

Symptom

The error were, "403 forbidden" when you visited web page hosted on httpd which use web agent service and "am_agent_init failed" in amAgent log file.

#detailed amAgent error
2014-08-14 09:23:20.351    Error 4841:47170489365360 all: Connection::request() socket not available, error 20
2014-08-14 09:23:20.351    Error 4841:47170489365360 Agent Profile Service: isRESTServiceAvailable(): An error occured while doing naming request. HTTP error
2014-08-14 09:23:20.352    Error 4841:47170489365360 all: agent_worker_init() am_agent_init failed

If I restart httpd server now, both error will go away.
This makes me think that maybe it because when httpd starts and initiates web agent, Tomcat has not fully started yet. 

Checking time stamps of apache log file and amAgent log file, I knew Tomcat started to init on 9:23:22 till 9:24:20; and httpd started to init web agent on 9:23:20. These data prove I am right.


# key timing in tomcat log file
Aug 14, 2014 9:23:22 AM org.apache.catalina.core.AprLifecycleListener init
Aug 14, 2014 9:24:20 AM org.apache.catalina.startup.Catalina start
INFO: Server startup in 57158 ms
# key timing in httpd log file
2014-08-14 09:23:20.292       -1 4840:47170489365360 all: Version: 4.0.0-SNAPSHOT
Using ps auxcheck the start time also proves that httpd initiates before tomcat fully started.

Solution

Run these init processes in the same script, rc.local, and let the calling thread sleep 120 seconds before initiating httpd for now, until a better solution is found.

OPENDJ_ROOT="/opt/sso/opendj"
TOMCAT_ROOT="/opt/sso/apache-tomcat-7.0.52"
export OPENDJ_ROOT
export TOMCAT_ROOT
cd ${OPENDJ_ROOT}
/bin/su - nctrsso -c "${OPENDJ_ROOT}/bin/start-ds --quiet"
cd ${TOMCAT_ROOT}
/bin/su - nctrsso -c "${TOMCAT_ROOT}/bin/startup.sh"
sleep 120
/etc/init.d/httpd start
exit 0

Installing Oracle 11g R2 Express Edition on Ubuntu 14.04 64-bit Virtual Machine

I need Oracle APEX for one of my project. Instead of waiting for the company DBA configure a workspace for me, I decide to install a local copy of Oracle and APEX myself to familar with.This is part one: install Oracle on UBuntu 14.04 64Bit

Environment

Ubuntu 14.04 64Bit virtual machine
Oracle 11g R2 Express Edition (XE)

Requirement:

Please go over every item below to make sure that your system meets these requirements.

1). Oracle 11g R2 Express Edition may require up to 2GB swap space. please use free -m to verify that you have at least 2G swap space. If you do not have enough swap space, like in my case, then do the followings.

Figure 1. verify that you have enough swap space.

#switch to root
sudo su -
#create swap file on /swapfile
dd if=/dev/zero of=/swapfile bs=1024 count=1048576
mkswap /swapfile 
swapon /swapfile
#backup old fstab file and create a new one
cp /etc/fstab /etc/fstab.bak_`date +%N`
echo '/swapfile swap swap defaults 0 0' >> /etc/fstab
#enable all swap devices
swapon -a
#verify the new swap devices
swapon -s
free -m
2). Install alien for converting the downloaded installer from Red Hat format into Ubuntu-specific installer
sudo apt-get install alien libaio1
3). Configure Awk for compatibility
sudo ln -s /usr/bin/awk /bin/awk
4)Create the following folder if needed
sudo mkdir /var/lock/subsys
5). Create a special chkconfig script:
The Red Hat based Oracle 11gR2 XE installer relies on /sbin/chkconfig, which is not available in Ubuntu. This command will create a file /sbin/chkconfig to simulate the chkconfig tool.
sudo vim /sbin/chkconfig
copy and paste the following content into the newly created chkconfig file
#!/bin/bash
# chkconfig simulator for Oracle 11gR2 XE installer 
file=/etc/init.d/oracle-xe
if [[ ! `tail -n1 $file | grep INIT` ]]; then
echo >> $file
echo '### BEGIN INIT INFO' >> $file
echo '# Provides: OracleXE' >> $file
echo '# Required-Start: $remote_fs $syslog' >> $file
echo '# Required-Stop: $remote_fs $syslog' >> $file
echo '# Default-Start: 2 3 4 5' >> $file
echo '# Default-Stop: 0 1 6' >> $file
echo '# Short-Description: Oracle 11g Express Edition' >> $file
echo '### END INIT INFO' >> $file
fi
update-rc.d oracle-xe defaults 80 01
Save the above file and assign the appropriate execute privilege :
sudo chmod 755 /sbin/chkconfig
6). Fix /dev/shm to avoid having "cause ORA-00845: MEMORY_TARGET not supported on this system" error.

sudo rm -rf /dev/shm
sudo mkdir /dev/shm
sudo mount -t tmpfs shmfs -o size=2045m /dev/shm # whatever value showing in your free -m output.

Installation


1). Download Oracle 11gR2 Express Edition installer from Oracle official site. You need an account to be able to download.

2). Unzip and convert the rpm package to deb package
cd /opt/oracle_src
mv ~/Downloads/oracle-xe-11.2.0-1.0.x86_64.rpm.zip .
unzip oracle-xe-11.2.0-1.0.x86_64.rpm.zip
cd Disk1/
#prepare Ubuntu specific package
sudo alien -d -c oracle-xe-11.2.0-1.0.x86_64.rpm 
#it takes a while for the command to complete.
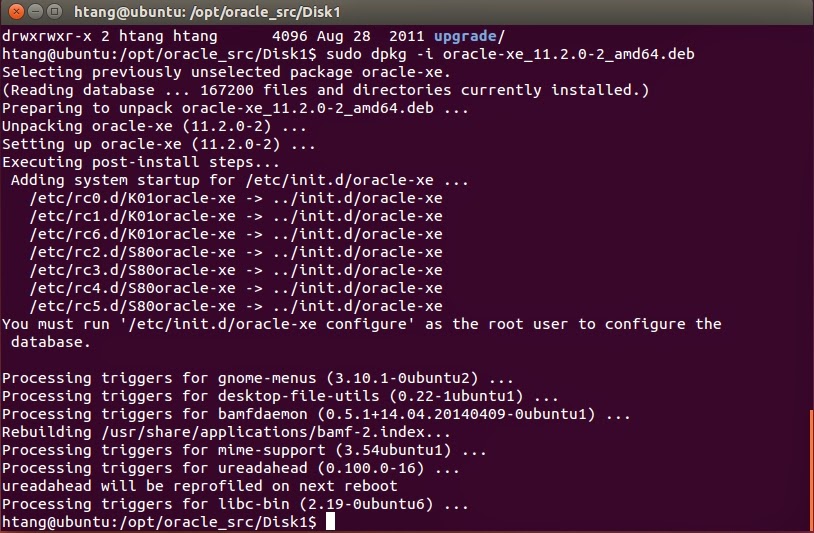
3). Now you are ready to install Oracle 11gR2 XE.
cd /opt/oracle_src/Disk1
sudo dpkg --install oracle-xe_11.2.0-2_amd64.deb

 Fig 2. Output from installing script
4) configure
sudo /etc/init.d/oracle-xe configure
Enter the following configuration information:
HttP port:8080
port used for database listener:1521
password for SYS and SYSTEM:tiger
Do you want Oracle XE to be startted on boot: yes
Congratulations, once you see the following figure.
Fig 3. Success configuration screen

5. Post-installation configuration
5.1 Set-up environmental variables : add the following lines to ~/.bashrc file
vim ~/.bashrc
#copy the following line to file .bashrc
export ORACLE_HOME=/u01/app/oracle/product/11.2.0/xe
export ORACLE_SID=XE
export NLS_LANG=`$ORACLE_HOME/bin/nls_lang.sh`
export ORACLE_BASE=/u01/app/oracle
export LD_LIBRARY_PATH=$ORACLE_HOME/lib:$LFigure 1. verify that you have enough swap space.D_LIBRARY_PATH
export PATH=$ORACLE_HOME/bin:$PATH
5.2 update environment variable
. ~/.bashrc
5.3 try logging into database
sqlplus sys as sysdba [tiger]
6. Use APEX The default APEX installed is Application Express 4.0.2.00.09, which could be reached at http://127.0.0.1:8080/apex

Question and solution 

1.Database configuration failed during configuration step."Database Configuration failed.Look into /u01/app/oracle/product/11.2.0/xe/config/log for details". When I look at these files, ORA-00845: MEMORY_TARGET not supported on this system was the main complain.
Solution:
1) Do step 6 in requirement section
2) then do these steps below
# get the pid of oracle, 3120 in my case
ps aux | grep oracle 
#kill oracle
sudo kill 3120
#check again to make sure that oracle is killed
ps aux | grep oracle 
#remove the installation
sudo dpkg --purge oracle-xe
rm -r /u01
rm /etc/default/oracle-xe
update-rc.d -f oracle-xe remove
5) re-run the installation step 3) and 4)

Firefox Always Crashes in Ubuntu

Recently Firefox always crashes in my Ubuntu box. By looking at the crash report I noticed that add-ons might have something to do with the crash. However, the problem is still there after removing/disabling all add-ons. I even tried to update Firefox, that does not solve the problem neither. I then tried remove all contents related to Firefox and reinstalled it, and it seems fix the problem for me.
sudo apt-get --purge remove firefox
rm -rf ~/.mozilla/firefox/
sudo rm -rf  /usr/lib/firefox*
sudo apt-get install firefox

Datatable static image not found on the server

When you use ```datatables.min.css``` and ```datatables.min.js``` locally, instead of datatables CDN, you may have encountered that ```sort...