Use TPTP in Eclipse

This is a little Tutorials about how to install TPTP in Eclipse.
What is TPTP?
Eclipse Test and Performance Tools Platform (TPTP) is a Eclipse project that contains tools for performance-testing, application profiling and testing an application.
More Information? http://www.eclipse.org/tptp/
1.Suppose you are not have TPTP ready in you Eclipse IDE.
Go to help>Install new Software...
select "Galileo - http://download.eclipse.org/releases/galileo" in the pop out window and select "Test and Performance" sub-choice. In "Test and Performance" I select all of them.

Click Next and follow the screen to install the TPTP for your Eclipse IDE.
2. Open the project which you want to profile in Eclipse.
3. Right click the main class of your Java project, and choose "Profile as>Profile "Configurations...", if you are running for the first time.


In the monitor panel of the pop out window, select "Execute Time Analysis".
Then click"Profile"
"Switch to the perspective "Profiling and Logging" if you are asked.
Here you can see the report based on your selection."
4. If you are not running the profile for the first time, choose "Java
Application" in stead.
5. After running the program will take you to the result screen.

How to use jRat in Eclipse

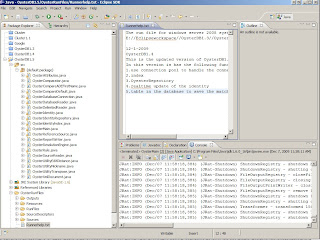
jrat and Eclipse


1. Donwload jrat from:http://jrat.sourceforge.net/
Extract the download file into c:\jRat
2. Open the project which you want to profile use jRat in Eclipse
in this case, I am using OysterDb1.5 as example.


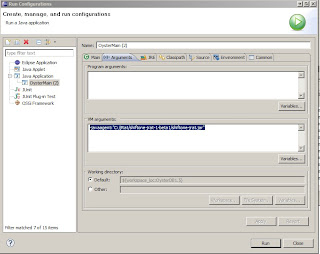
3. From the drop doqn list Run>Run Configurations.....
In the field of VM arguments input the following:
-javaagent:"C:/jRat/shiftone-jrat-1-beta1/shiftone-jrat.jar"
click APPLY


4.Run your project as usual. when you run the program, you will see a whole bunch of output from the console regarding jRat, that means you run jRat successfully.

5. After finish running your project, go to the project folder: In this case should be OystrDB1.5 and you will se folder named "jrat.output". This is the folder contains the jRat outputs.
6. Run java -jar shiftone-jrat.jar from command Promt.


You will open a window "Jrat Desktop". select file>Open and then point to the "jrat.output". Open the output file and see the statistics results.

Remote Connect To Windows Server 2008 Data Center From Mac

Microsoft has Remote Desktop mac edition, but when you use it to connect your Windows Server 2008, you may encounter such problem:
"You were disconnected from the Windows-based computer because of problems during the licensing protocol."

Here is one solution, instead of using this program you can use
CoRD, which is free.


You can download CoRD from Sourceforge.

PostgreSQL Database Cluster Initialisation Failed Solution

How to install postgreSQL on Windows Server 2008 64Bit

I tried several times to install postgreSQl on Windows Server 2008, but failed due to "PostgreSQL Database Cluster Initialization".
I tried to install it to another path instead of c:\Program files(x86), but no success. Then I follow one solution online proposed for vista, adding full control power for the use postgres on the installing folder. Again there is no success.
Then I tried to install it through the binariew installer. The one I used is v8.3.7.

Error : “ 'more' is not recognized as an internal or external command, operable program or batch file. "

When you type in \dt and the postgreSQl pops " 'more' is not recognized as an internal or external command, operable program or batch file. "

This is because "more" exists in C:\Windows\System32 and you did not add it to your PATH Environment Variable.
To do so, My Computer (Right Click) -> Properties -> then go to Advanced tab -> Environment Variable -> set the path by adding C:\Windows\System32. Be sure to use ; to separate from other paths may exit here.

Error : “ 'more' is not recognized as an internal or external command, operable program or batch file. "

When you type in \dt and the postgreSQl pops " 'more' is not recognized as an internal or external command, operable program or batch file. "

This is because "more" exists in C:\Windows\System32 and you did not add it to your PATH Environment Variable.
To do so, My Computer (Right Click) --> Properties --> then go to Advanced tab --> Environment Variable --> set the path by adding C:\Windows\System32. Be sure to use ; to separate from other paths may exit here.

$2222

PostgreSQL常规用法

PostgreSQL的实用程序:
(1)用户实用程序:
createdb 创建一个新的PostgreSQL的数据库(和SQL语句:CREATE DATABASE 相同)
createuser 创建一个新的PostgreSQL的用户(和SQL语句:CREATE USER 相同)
dropdb 删除数据库
dropuser 删除用户
pg_dump 将PostgreSQL数据库导出到一个脚本文件
pg_dumpall 将所有的PostgreSQL数据库导出到一个脚本文件
pg_restore 从一个由pg_dump或pg_dumpall程序导出的脚本文件中恢复PostgreSQL数据库
psql 一个基于命令行的PostgreSQL交互式客户端程序
vacuumdb 清理和分析一个PostgreSQL数据库,它是客户端程序psql环境下SQL语句VACUUM的shell脚本封装,二者功能完全相同
(2)系统实用程序
initdb 创建一个用于存储数据库的PostgreSQL数据目录,并创建预定义的模板数据库template0和template1,生成共享目录表catalog;此程序通常只在安装PostgreSQL时运行一次
initlocation 创建一个辅助的PostgreSQL数据库存储区域
ipcclean 从停止的PostgreSQL服务器中清除共享内在和孤立信号标志
pg_ctl 启动、停止、重启PostgreSQL服务(比如:pg_ctl start 启动PostgreSQL服务,它和service postgresql start相同)
pg_controldata 显示PostgreSQL服务的内部控制信息
postgres PostgreSQL单用户模式的数据库服务
postmaster PostgreSQL多用户模式的数据库服务
4.这里面最重要的是psql这个客户端程序最为重要。启用客户端程序psql的方法是:
切换到PostgreSQL预定义的数据库超级用户postgres,启用客户端程序psql,并连接到自己想要的数据库,比如说:
psql template1
出现以下界面,说明已经进入到想要的数据库,可以进行想要的操作了。
template1=#
5.在数据库中的一些命令:
template1=# \l 查看系统中现存的数据库
template1=# \q 退出客户端程序psql
template1=# \c 从一个数据库中转到另一个数据库中,如template1=# \c sales 从template1转到sales
template1=# \dt 查看表
template1=# \d 查看表结构
template1=# \di 查看索引
6.要注意随时对数据库进行清理、收回磁盘空间并更新统计信息,使用下面的命令就搞定!
vaccumdb -d sales -z
-a 对所有的数据库操作
-z 保证不断地删除失效的行,节约磁盘空间,将统计信息更新为最近的状态
7.PostgreSQL用户认证
PostgreSQL数据目录中的pg_hba.conf的作用就是用户认证,可以在/var/lib/pgsql/data中找到。
有以下几个例子可以看看:
(1)允许在本机上的任何身份连接任何数据库
TYPE DATABASE USER IP-ADDRESS IP-MASK METHOD
local all all trust(无条件进行连接)
(2)允许IP地址为192.168.1.x的任何主机与数据库sales连接
TYPE DATABASE USER IP-ADDRESS IP-MASK METHOD
host sales all 192.168.1.0 255.255.255.0 ident sameuser(表明任何操作系统用户都能够以同名数据库用户进行连接)
8.看了那么多,来一个完整的创建PostgreSQL数据库用户的示例吧
(1)进入PostgreSQL高级用户
(2)启用客户端程序,并进入template1数据库
psql template1
(3)创建用户
template1=# CREATE USER hellen WITH ENCRYPED PASSWORD'zhenzhen'
(4)因为设置了密码,所以要编辑pg_hba.conf,使用户和配置文件同步。
在原有记录上面添加md5
local all hellen md5
(4)使用新用户登录数据库
template1=# \q
psql -U hellen -d template1
PS:在一个数据库中如果要切换用户,要使用如下命令:
template1=# \!psql -U tk -d template1
9.设定用户特定的权限
还是要用例子来说明:
创建一个用户组:
sales=# CREATE GROUP sale;
添加几个用户进入该组
sales=# ALTER GROUP sale ADD USER sale1,sale2,sale3;
授予用户级sale针对表employee和products的SELECT权限
sales=# GRANT SELECT ON employee,products TO GROUP sale;
在sale中将用户user2删除
sales=# ALTER GROP sale DROP USER sale2;
10.备份数据库
可以使用pg_dump和pg_dumpall来完成。比如备份sales数据库:
pg_dump sales>/home/tk/pgsql/backup/1.bak

Installation of Ubuntu on Vista pre-installed machine and preparation for using EasyBCD as booting manager

Installation of Ubuntu on Vista pre-installed machine and preparation for using EasyBCD as booting manager.

1. First you need prepare some free disk space for ubuntu by using Vista disk manager.

2. Insert your Ubuntu CD or DVD in the drive, and boot from it to begin setup. Choose "install Ubuntu" from the
bootable menu.

3. Follow the on screen instructions until you get to a screen asking you for your preferred method of
partition your hard drives. Make sure you choose "manual" at this point so you can configure your dual-boot
exactly as you need it.

3. Find the free space on the drive which you prepared in vista and create a new
partition there. Choose "ext3" as the filesystem type, and use it as the root "/" the mountpoint.
Here you can partition (n-2)G of your free space as the main partition to install Ubuntu. And use the rest of the partition 2G as the swap disk (choose swap as filesystem).

4.Once you've partitioned the drive the way you like it, you come to the single most-important step: telling Ubuntu
where to install GRUB, the Linux bootloader.
pay special attention here, on the final install conclusion screen there is a "advanced" button, click it to set up the installation destitionation of GRUB. Here you need to choose the partition which you used as the root mountpoint.

4.finished installation.
5.Boot into vista and install EasyBCD.
6. go to "Add/remove Entries" page. choose "Linux" tab from the bottom-half of the screen.
7.Pick the partition you installed Ubuntu to earlier from the drop-down partition list and choose "Add entry"
8. save

Simple Command to Check Your Windows 7 Expiration date

Check you Windows 7 Bets version evaluation end date:
slmgr.vbs -dlv

Simple Command to Check Your Windows 7 Expiration date

Check you Windows 7 Bets version evaluation end date:
slmgr.vbs -dlv

How to install Microsft Applocale on Windows 7

Open Windows, All programs, Accessories, right click Command Prompt and choose run as administrator.
Change the path to the folder where you store the source file apploc.msi.
At command window type in apploc.msi, then follow the instructions ti finish the installation.

Did you solve your slow Internet connection on Ubuntu 8.1?

Recently I am facing a slow Internet connection problem on my newly installed Ubuntu 8.1.

Let me describe the problems first:

During the first couple days of using newly installed Ubuntu, I have no problem and the Internet is as fast as in Vista. But after a couple of updates, the Internet speed changes dramatically. As I noticed the mainly change is the browsing speed not the download speed. It needs at least 1 minute to open gmail.

I tried several methods to improve the browsing speed, like disable IPV6; switch to another browser,like Opera,Swiftweasel; install dnsmasq and change the MTU value; as suggested but none of them work on my case.


Untill today, I find a solution from http://www.prash-babu.com/2008/04/how-to-configure-dns-servers-in-linux.html

It really works for me, so I want to introduce it to you, if you are facing the same problem like me. Why not try?

Do the following steps to configure DNS servers in Ubuntu:

Step 1:Go to Applications->Accessories->Terminal and type
sudo gedit /etc/dhcp3/dhclient.conf
Step 2:Go to the end of the file and add the following line to the END of the file
prepend domain-name-servers 208.67.222.222,208.67.220.220;
Step 3:Save the file and close it.
Step 4:Use the following command to restart your network
sudo /etc/init.d/networking restart

Step 5: Open your favorite browser to check whether works or not.

Install VMD on Ubuntu

1. Register and download the suitable version of VMD from http://www.ks.uiuc.edu/Development/Download/download.cgi?PackageName=VMDLINUX
In my case I choosed:
AMD64 OpenGL (Linux (64-bit AMD or Intel EM64T x86) with hardware OpenGL)
2. Open downloaded package and check the configure file, and make sure that the installed path is: install_bin_dir="/usr/local/bin".
3.In terminal type in
./configure
cd src
sudo make install
4. after finish, type in vmd in terminal to check whether you can run it. In my case I got an error something like: bash: vmd: /bin/csh: bad interpreter: No such file or directory
If you have the same error you probably also need install csh from Synaptic Package Manager.

1)To install csh: go to synaptic package manager, type in csh to find csh related package
2) right click and choose "mark for installation". Then apply.
Then you can try again in the terminal by typing vmd.

My way to Install unrar and rar in Mac OS

1. Download the correct version of Winrar from www.rarlab.com, and run the downloaded file to extract the package.
2. Use OnyX change the parameters of the finder to show hidden files on your Mac.
3. Locate and copy binary files unrar and rar to your bin folder (Macintosh HD/bin).
4. Change the finder parameters back to hide the hidden files.
5. Suppose you have a folder named “EXAMPLE” want to compress.
6. Launch terminal and go into this folder “EXAMPLE” and type

rar a EXAMPLE
And a rar file named EXAMPLE.rar will be in the folder after finish.
7. You also can compress the file into specific size by using the -v parameter,
rar a -v[size] EXAMPLE
Here the size is in KB
8. Use the following command to uncompress a compressed file:
unrar e EXAMPLE.rar

My way to install Ubuntu on Vista preinstall computers

Dual Boot of Windows Vista and Ubuntu and use EasyBCD as bootloader

If your new computers comes with Windows Vista preinstalled, please follow the following procedure to install Ubuntu and.

1.Log into Vista open disk manager to free some disk spaces.
2.Reboot your computer use Ubuntu Live CD. Choose “setup Ubuntu” from the bootable manual .
3.Click the install icon on the live session Ubuntu desktop, follow the instruction until you see “choose the partition method”.
4.Make sure you choose manual at this step and click next.
5.In the next screen, select the free disk spaces which you prepared in Vista and create a new partition. Usually, you can make a partition as large as the (your maximum free disk space -2G), and select the file system type as ext3, mount point is root “/”.
6.use the rest of 2G free disk create a new partition, swap, choose the file system type “swap”.
7.Once you partitioned your disk, before you install your Ubuntu, on screen 7, choose “advanced” and select the partition which you used to install the root of Ubuntu to install the Ubuntu boot loader. In my case I installed Ubuntu at “sda6”, so I choose it to install GRUB.
This step is important if you want to use vista boot loader.
8. Finish the rest steps on installation and grab a cup of tea.

After finishing install Ubuntu, log into Vista and install EasyBCD boot loader:


9.Open EasyBCD and go to the "Add/Remove Entries" page.
10.Choose the "Linux" tab from the bottom-half of the EasyBCD screen.
11.Pick the partition you installed Ubuntu from the drop-down partition list (In my case it is sda6, as I mentioned early)and choose "Add Entry".
Now you have Vista and Ubuntu dual boot.

Datatable static image not found on the server

When you use ```datatables.min.css``` and ```datatables.min.js``` locally, instead of datatables CDN, you may have encountered that ```sort...